Tuesday, April 2, 2013

random #1

Assalamualaikum.. hello, hye all

it's been a while since I login to my blog and write something here, feel so lazy to update even though there's so many things that I should update on this blog cuz this blog is all about my course here and everyone in this class are compulsory to write anything about anything that we have been learn but i'm so lazy la .. lazy..haha

ehem.. so here i come, i wanna share about our last month activity at Wadi Sakinah and Lembah Bujang. actually we went to Wadi Sakinah to do some virtue work..err, i mean kerja kebajikan :) we were join MRA for this event.. so here, lets the picture tell everything :)


we were lost.. but possing is must. haha


before going back..we took picture together


at lembah bujang... after going to wadi sakinah


NetSec batch 13 :)


:)


we went to eat "cendol pulut" and "abc" before go back home :)


that's all..hope that i'll get a mood to update something that related to my course soon... :)


Tuesday, March 12, 2013

how to set proxy to block website using Squid and Webmin


Hai everyone, today i will share with you all about how to block a website. usually people block a website such as facebook.com or youtube.com  in shcool's or college computer lab to prevent student to do something unuseful during lesson session in the class.

There's so many way to do this thing (blocking a website) but me, i used CentOs as a server  and install Squid and Webmin inside to set the proxy.. ok, let's start

the things that i used :
1. VmWare (a virtual machine to install another OS in our computer such as linux,win7,xp, etc..)
2. CentOs
3.Squid
4.Webmin

**Squid and Webmin already have in CentOs ..you just need to find its installer and install it. if you can't find, just download and install automatically form the internet

1. install VmWare


2. install CentOS in VmWare by clicking Click a new virtual machine

 my centOs' desktop


3. install Squid

find squid's installer in cd /media/CentOs_5.3_Final/CentOs

if you didn't find an installer, you can download and install it automatically from the internet using this command yum -i install <Program name> example : yum -i install squid .make sure you have an internet connection

ls |grep  <program name name> :: to find file instantly using name. the name of file installer will end with .rpm (in window .exe) ..for example ls |grep squid

rpm -ivh <program name name> :: command to start installation process for example
rpm -ivh squid

rpm -q <program name :: command to check either the program already installed or not
rpm -q squid

/sbin/service <program name> start        : command to start a program
/sbin/service <program name> stop         : command to stop a program
/sbin/service <program name> restart     : command to start a program
/sbin/service <program name> status      : command to check the status of a program 

** type program name without < > symbol for example /sbin/service squid status
** all of the program that you want to install using this step. just change the program name

4.install Webmin (local host)

install Webmin using the same way like squid. just change the program name..

when finish installing, go to mozillah firefox and go to local host by typing this address http://localhost.localdomain:10000/ 

now, follow this step :

a) go to webmin and then click "server"


b) now, choose "squid proxy server"


c)enter to "access control"


d)choose "web server regexp" and click "create newACL"
 

e)put the website url that you want to block (but it can't block HTTPS website.only http)


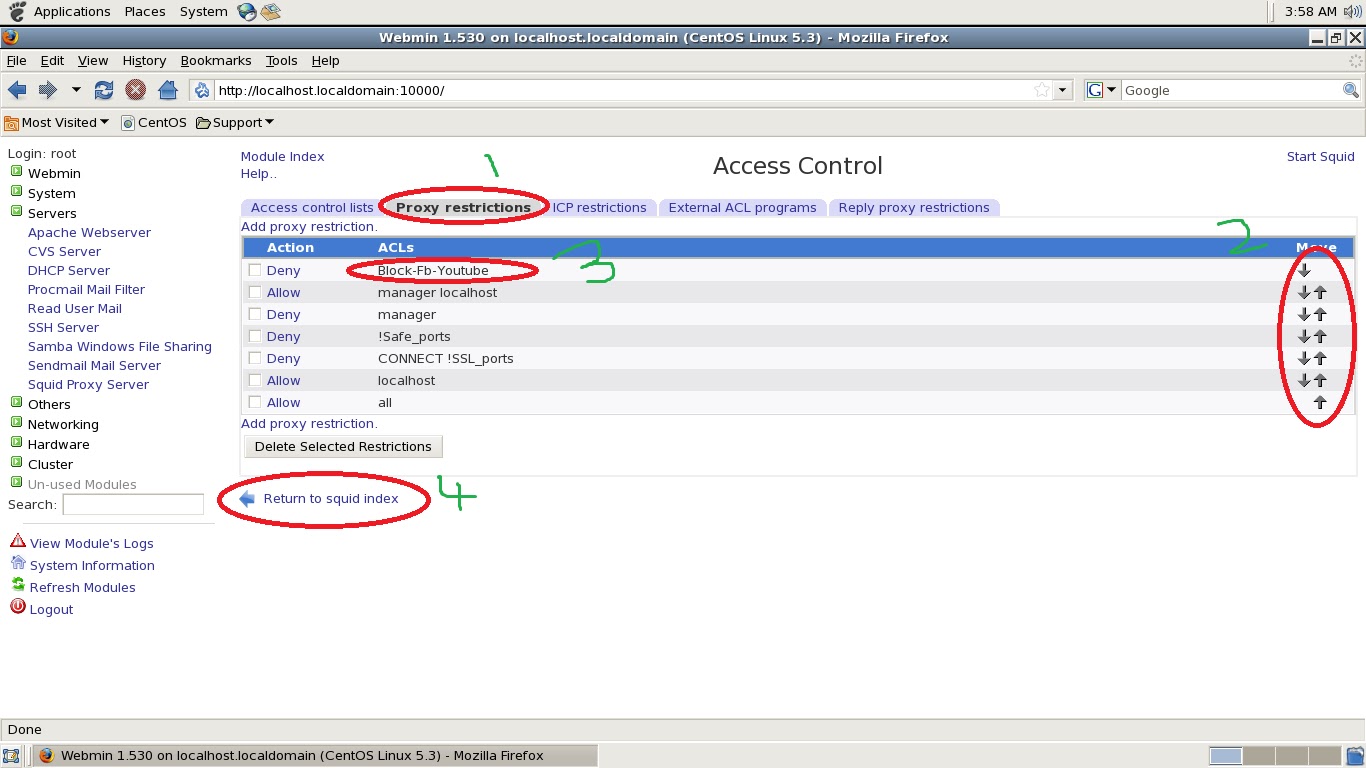
 f)go to proxy restriction and the make the website that you want to block be the first in the row and the return to squid index


g) after finish, go to "ports and networking" to set the port for the network


h) default port is 3128 (you can change if you want...after that click save and return to squid index


 i)now, start squid


 j) go to your web browser and go to option


k) click advance

l) choose network and go to setting


m) choose "manual proxy configuration" and then enter your server's ip and port. after finish. press ok.


 now, your server will start working and someone will not be able to go to the web page that has been block.

feel free to share your though and knowledge about this with me..and feel free to try this tutorial too :)


Monday, February 25, 2013

how to hide text on the picture using steganography tools


steganography is the method to hide a data such as text into a single picture so that no one can read the text except the authorized person (sender to receiver)

there's so many tools and way that can be used but today i will share to you all about how to hide the text into picture using stegano tools that i used. this tools is user friendly and so easy to use.

you can download this tools here 


1. first step you can do is to choose one of picture that you want to use to hide the text

as you can see, i used red.jpg to hide my text. here we can see that the file size is small

2. second step, open image that you already chose into quick stego


3. create text in the space given and then hide text


4. press save image


this is the image that have been save before. here we can see that the size of picture is bigger than before. besides, the format of picture also change eventhogh it still a same picture

now, to check the hidden text that has been hide beside the picture, that's a very simple step. all you need is just press open image and then press get text.
now, you can see the text that hidden beside the pic


feel free to try this tutorial .. enjoy!! :)


Sunday, February 24, 2013

how check integrity of file using md5 tools


Md5 is a one of mehtod that can be used to check the integrity of file or system. so
today, i will share to you about how to check the integrity if the system/file using this tools.

first of all, you need to download md5 tools here. there's so many md5 tools that can be used but i just using this tools.


secondly, all you need is just browse the file (picture/music/video etc) that you want to check (click the picture to get the large view)


here i used sun.jpg .. i've check the checksum of this picture using md5 tools and then i will compare the cheksum of this picture after editing (click the picture to get the large view)


this is the sun.jpg picture that has been edited. here, you can see the name of the picture is still the same (sun.jpg) but the checksum is different because it was edited.

here we can check that the first picture (sun.jpg) is not the same with the second picture (sun.jpg) eventhough the name of file is same. 

so this is one of method that we can used to check the integrity og the file..

feel free to try it! enjoy ! :)


Wednesday, February 13, 2013

Ping (RTO , DU and REPLY)


Assalamulaikum.

Ping. taw dak PING tu ape? PING, bukan PINK.. so here i will describe to you all about that..ok..Ping ni secara mudahnya adalah suatu kaedah yang digunakan untuk chek rangkaian samada bersambungan ataupun tidak menggunakan alamat IP

contohnya jika komputer A nak tahu samada dia ley connect ngan komputer B, dia hendaklah menggunakan PING untuk mengetahui status network tersebut..

kalau someone nak hack mana-mana komputer pun, perkara petama yg mesti dilakukan adalah chek samada boleh connect ataupun, so caranya, kenalah Ping IP address terlebih dahulu

cara-cara nak PING IP ADDRESS

1. gunakan CMD ...
Jika anda menggunkan win7, taip jer CMD kat start menu tuh then nanti akan keluarlah kotak hitam macam nih


2. taipkan perkataan PING diikuti dengan IP address yang anda hendak PING

Apabila komputer A hendak PING ke komputer B , terdapat 3 jenis ''hasil'' daripada PING iaitu

a).RTO (Request Time Out)
apabila PING daripada komputer A sampai kepada komputer B , tetapi PING daripada komputer B (apabila B hendak REPLY kepada A) tidak sampai kepada komputer B


2.DU (Destination Reachable)
apabila PING daripada komputer A tidak sampai kepada komputer B dan begitu juga PING daripada komputer B tidak sampai kepada komputer A
DU ni boleh terjadi jika


3.REPLY
apabila PING daripada A sampai kepada B dan komputer B juga berjaya menghantar PING kepada komputer A


**sebenarnya gambar A dan B tu adalah mewakili komputer A dan komputer B but becoz of xda gamba komputer and i'm soo lazy to draw a comp pic so anggap je lah laki A dan pmpn B tu adalah komp ek...hehe :D

Friday, February 8, 2013

cara pemasangan kabel UTP


dalam sistem pemasangan rangkaian LAN, terdapat beberapa jenis wayar yang boleh digunakan antaranya ada;ah twisted-pair cable. twisted pair cable terbahagi kepada 2 iaitu

i. Kabel UTP (Unshielded twisted-pair)
ii. Kabel STP (Shielded twisted-pair)

untuk hari ni, saya akan berkongsi cara pemasangan kabel UTP.
untuk pemasangan kabel UTP, langkah-langkahnya adalah :

1. sediakan perkakasan berikut :

a) kabel UTP
b) soket rj 45
c) crimping tools
d) cutter
e) connector casing

2. masukkan connector casing kedalam kabel

3. potong kabel dengan menggunakan cutter

3. buka pilinan kabel dan luruskan. kemudian, susun mengikut warna berikut 


4. gunakan cutter, gunting ataupun crimping tools untuk memotong kabel bagi memastikan panjang setiap kabel adalah sama

5. masukkan kabel tadi kedalam RJ45 mengikut susunan warna yang betul

6.dan akhir sekali, gunakan crimping tools untuk mengetatkan soket RJ45 dengan kabel UTP

7. gunakan cable tester untuk mengesan samada cable boleh digunkan ataupun tidak


sumber diambil dari sini dan sini 


Wednesday, February 6, 2013

IP Address


IP Address  

>> IP Address atau alamat IP adalah set of rule to communicate for communication in network ..
>> setiap device yg bersambung dengan rangkaian mempunya satu alamat IP yang diwakili oleh sistem nombor.
>> IP terbahagi kepada 2 jenis iaitu IPv4 dan IPv6

IPv4 
> bermula pd tahun 1983
> mempunyai 32 bits
> masih digunakan sehingga kini

IPv6
> bermula pada tahun 1999 tetapi belum digunakan secara meluas pada ketika itu
kerana kebanyakan device tidak menyokong IPv6 dan IPv4 masih boleh digunakan
> mempunyai 128 bits


bersambung .... :P